Thursday, October 10, 2013

Biscuits & Gravy Casserole

I am a Southern girl who likes her comfort food.   The trouble with Northern Virginia is that if you want some good old comfort grub from the South, the only place you can go around here that even smacks of home cookin' is Cracker Barrel.  Don't get me wrong...I love me some Cracker Barrel.  Chicken fried steak, biscuits, country ham, dumplins and fried okra?  Um, yes please!

When I feel the need for some super yummy comfort food, I go to the one dish my husband turned me on to - oddly, after I had moved to Northern Virginia! - biscuits and sausage gravy.  One taste and I was wondering how I had lived without this in my life for so long.  Why had no one made this for me before and forced me to try it? (yeah...okay...not that anyone is going to have to force me to try anything that has the words "biscuits" or "gravy" in it)

But I digress.

Usually he is the master chef behind this dish when we have it, but my poor dude has spent the last 4 days working four - count 'em FOUR - 16 hour shifts.  So I always want to make sure he has something yummy to come home to.  Besides me, of course...bwahaha!

Have I mentioned I like simple cooking?
Yeah.  Lazy cooking.
That's the way this house rolls for the most part.  I still throw in a complicated recipe every now and then just to prove I can do it.  (chocolate Guinness cupcakes with Bailey's Irish Cream buttercream and chocolate whiskey ganache are no joke to make, but sooo worth it)

In any case, I decided to turn our beloved biscuits and gravy into a casserole, hoping for more more servings than our greedy butts get with the traditional way of cooking it.  In a way I guess it kind of worked.  We got 4 servings out of it, but mainly because I immediately put them in containers and stuck them in the fridge.  Out of sight, out of mind and all that.  Well, usually.

It couldn't be ANY simpler to make this.

For starters, preheat your oven to a toasty 350­°. Now grab an 8x8 pan, and lightly grease it so the bottom of the casserole won't stick.

Take a one pound roll of sausage - any brand or flavor will do - and brown it in a pan.  Drain that and set it aside for later. Try not to nibble on the cooked sausage, even though the smell has to be driving you bananas.

Oh, is that just me?  Alrighty then.

Now you want to make that pepper gravy.  You can get a package and add water, then warm it on the stove.  That's the easy way to go, and nothing wrong with it at all!

I just find it easier - and a lot cheaper - to make my own.  One cup of milk, 3 tablespoons of flour, ¼ teaspoon of salt,  and 1 teaspoon black pepper.  You can be liberal with the pepper. Honestly, I just grabbed my pepper mill and added cracked pepper until I liked the way it looked. Let this simmer on the stove for a while until it thickens into gravy.  Make sure you taste it to make sure you don't need to add more salt or pepper.  Nothing is worse than gravy that tastes like cardboard!

You know that 8x8 pan you prepared?  Let's decorate it.

Grab a can of Grands biscuits. Now flatten four biscuits and smoosh them together in the bottom of the pan so they make a crust or sorts.

This is why you want to make sure you grease the pan.  Stuck on, inedible biscuits are a major cooking violation that should be illegal.  Wasting biscuits??  A good Southerner would beat you for that one. That's like throwing away fatback.  It's just not done, man!
*tsk*

Alrighty, combine that sausage with the gravy and pour it on top of those biscuits in the pan.

Now take the remaining four biscuits and smoosh them as flat as you can get them.  Making a good crust that covers the top as amply as the bottom was hard for me here...but mainly because I was getting hungry and not willing to spend a lot of time on it! That sausage gravy mixture was begging me to eat it by the spoonful, and it was growing harder and harder to resist so I needed to get that in the oven double time.
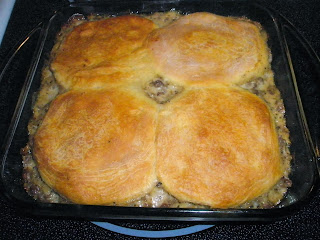


Drop that in the oven and bake it until those biscuits are golden brown.  Try not to grab a fork and dig in like a puppy.

Now if I were a good wife, I would have made my own biscuit crust instead of buying canned ones. I might Bisquick it one day and see how that turns out, but if I go whole hog and actually make biscuits from scratch, I am definitely not squishing them in a pan to be a crust.  I'm going to smother them in some marmalade or apple butter or just eat them plain.

Because...homemade biscuits.
Yeah.

Tuesday, October 8, 2013

Make Your Own Taco Mix!

We love tacos in this house. Actually, my husband introduced me to a wonderfully bachelor-iffic dish he calls Fracos (frah-coes).  It's all the beefy goodness of tacos, but instead of shells or tortillas...you put the meat in a bowl with all of the toppings and eat with with Fritos Scoops.
Sooooo good. Not so healthy, because you can tear through a bag of scoops in no time flat...but we still eat it once in a long while.

I knew my husband and I were a perfect match when I found out he likes out-of-the ordinary toppings on his tacos like me. He loves Thousand Island dressing on his, and I like pickle relish. I have no idea where I got the idea for pickles on a taco salad, but I think I recall my mom setting them out as a kid when we would have taco night. In a traditional taco salad, I'll go the full deal with lettuce, cucumbers, onions...and my beloved sweet pickle relish. No cheese. No taco sauce. No sour cream.

Wow, I'm a weirdo.

Unless someone else eats pickles on tacos. Then I'm pretty sure we're related.  Yay!

So when I was diagnosed with high blood pressure, I got worried about taco night.  I started monitoring my sodium intake, and it was scary. Switching out lower sodium options in my everyday life seemed like a good place to start some dietary changes...and sometimes with really nasty replacements. Thankfully I found an excellent - if not better! - substitution for taco seasoning.

First you round up the ingredients, and grab something airtight to store it in.
Here is your ingredient list:

  • 1/4 cup tablespoons ground cumin
  • 1 tablepoon ground paprika
  • 1/2 cup chili powder
  • 8 teaspoons corn starch
  • 4 teaspoons ground coriander
  • 1/2 teaspoon cayenne powder

If you like it spicy, add more cayenne. Sometimes I leave out the cayenne completely and this has enough kick for me, but I'm kind of a sissy when it comes to spicy food, so I wouldn't exactly trust my judgement!  

Drop it all in the jar together and give it a good shake. That is all there is to it!

The jar above gives the breakdown of how much to use per pound of meat, but in case you missed it, it's 1/4 cup of seasoning plus 1/2 cup water. We have used ground beef, ground turkey and ground chicken, and all are awesome...but I am a taco purist at heart and just like my ground beef flavor. You can add more or less for your own personal taste. This is completely customizable, which makes it even more awesome in my eyes.

Give it a try.  It's a delicious and low sodium replacement for taco seasoning, plus if you get the spices for a buck a piece, you're going to be able to save sooooo much money by making it in bulk!


Monday, October 7, 2013

Individual Chicken Pot Pies


It's been years since I have eaten a chicken pot pie. That was no accident, either.

The chicken pot pies that I knew and grew up on were of the frozen Banquet variety that took forever to cook, and always either ended up still cold in the center or the filling resembled molten lava that burned, what my mother always referred to as, the hair off your tongue.  I don't think my tongue actually has hair but I knew what she was trying to say, because I could feel that "hairless spot" every time I tried to eat something for days afterwards.

You ever have that happen to you?  It's creepy.

So I ran across these cans of Progresso Meal Starters in our local Dollar Tree for 50­­¢ a piece.  I grabbed one of each kind:  Fire Roasted Tomato, Basil Parmesan, Roasted Garlic and Three Cheese. (they also have portobello mushroom, but I am NOT a mushroom kind of gal)  Looking at the Roasted Garlic one night, they had a recipe on the side for chicken pot pie.  My brain started thinking back to something I saw on Pinterest once upon a time where people were making things in muffin pans lined with biscuits.  It just so happened that I had a can of Grands in the fridge.

First things first:  go ahead and preheat your oven to 350­° so it will be nice and hot when you're ready to put these puppies in there.

Since they were big biscuits, I decided to use my jumbo muffin tin.  (It should go without saying regular sized biscuits would go in a regular muffin tin, but I guess I should say it anyway.)  I didn't want them to stick, so I used my secret weapon to prep the tin.  Being a former cake queen, I found that Wilton's Cake Release is the most awesome thing ever to keep a cake from sticking, so I knew it would release those biscuits like nobody's business.

So after your pan is prepped, roll out the biscuits.  I have a rolling pin that my mom gave me when I moved out.  It's a huge, heavy marble contraption that collects dust on a shelf.

Don't have a rolling pin? Improvise.

I just took a big jar and pressed them flat, then used my hands to stretch them out and push them into the tins.  Make sure you cover the bottoms and the sides, spilling out over the tops of the pan just a little bit.  That will help keep the filling inside and not bubble over, soaking the bottoms of your biscuits. Secret weapon or no secret weapon, if that mixture bubbles over and ends up under the biscuits in the muffin tin...that's gonna stick.  AND be a nightmare to scrub out once it's cooked on.  Trust me.

Now what kind of chicken are we working with? The beauty of this recipe is that it doesn't require a lot of it to make these!

There are a lot of options, and three of them don't require cooking it yourself.  You can use a can of chicken (which would be my least favorite method, but if you're going to use it, hide it in a sauce is what I say).  You can buy a rotisserie chicken at the grocery store.  Eat what you want to make other meals, and then take the remaining chicken and chop it to use in this dish.  That's a cool, economical way to get more than one meal out of a single purchase.  You can also opt to boil your own chicken (save the broth!), and chop it up to add to the sauce for the pot pies.  You can also purchase the frozen, pre-cooked variety, thaw it out and chop it up.

Open your can of meal starter and pour it into a medium sized pot and turn it to medium heat. This might be a good time to mention that if you don't have the meal starter, you can use a can of cream of chicken soup and about 1/4 cup of water - or broth if you cooked your own chicken. I did that last time (hence the pic), and it's just as good.

After it's in the pot, add a can of mixed vegetables and about 1/4 teaspoon of pepper.  Let this heat through for about 5 minutes or so.  It should bubble a little bit but not boil, so adjust your heat as you need to accordingly.  You can actually start doing this before you begin prepping the biscuits in the muffin tins so it can be warming while you cook.  It doesn't really matter on the order, it just depends on your level of expertise in multi-tasking.  ;-)

Start carefully spooning your filling into the biscuits, making sure you leave enough room so that when the mixture bubbles in the oven it doesn't turn into a big mess.  If you think they will bubble over, put a cookie sheet beneath the muffin tin while they are cooking. You will thank me for this later if it happens to you.

Also, I should mention that a can of Grands has 8 biscuits...and my jumbo muffin tin has 6 openings. You can cook a second round after the first is done, or you can be impatient like me:  cut those biscuits in half and put them in a standard sized muffin tin to cook along with the others.  It doesn't affect cooking time, it just makes smaller pot pies. Also if you don't have a jumbo sized tin, you can make 16 smaller sized pot pies, which works out well for kids.  Not so much for hungry husbands, because they kind of look at it like it's a salad, or a "promise of more food to come."  (Thank you John Pinnette for that awesome reference that still makes me laugh to this day!)

Pop those buggers into the pre-heated 350­° oven and cook them exactly as it says on the package - about 15 or so minutes - depending on your oven. The biscuit will be golden brown when it's ready. Take them out and let them sit for about 4-5 minutes in the tins before you remove them from the tins. Try running a mini rubber spatula around the edges to get it to slide out the easiest.

These are so good...they put those bricks of pot pies from my childhood to shame.  Not that the bar was set real high to begin with, mind you.  They are also quick to throw together, easy to do, and freeze well if you are just making these for one person.  (This is Food for the "Single" Dude, after all!)  If you freeze them, try putting them in a single layer so that they don't stick together when you're ready to eat them.  You can either zap them in the microwave, or pop them back in the oven until heated through.  Don't let them thaw first.  The dough will get soggy.  Ew.

Enjoy!